
1 简介
之前讲过如何通过Docker安装Redis,也讲了Springboot以Repository方式整合Redis,建议阅读后再看本文效果更佳:
(1) Docker安装Redis并介绍漂亮的可视化客户端进行操作
(2) 实例讲解Springboot以Repository方式整合Redis
本文将通过实例讲解Springboot以Template方式整合Redis,并遇到一些序列化的问题。代码结构如下:

2 整合过程
与文章《实例讲解Springboot以Repository方式整合Redis》相同的代码不再列出来,文末将提供代码下载方式。
2.1 自动配置类
把相关依赖引入到项目中后,Springboot就自动帮我们生成了Template类,分别是RedisTemplate和StringRedisTemplate。看一下自动配置类能看出这两个类都已经创建到Spring容器里了。
public class RedisAutoConfiguration {
    public RedisAutoConfiguration() {
    }

    @Bean
    @ConditionalOnMissingBean( name = {"redisTemplate"} )
    public RedisTemplate<Object, Object> redisTemplate(RedisConnectionFactory redisConnectionFactory) throws UnknownHostException {
        RedisTemplate<Object, Object> template = new RedisTemplate();
        template.setConnectionFactory(redisConnectionFactory);
        return template;
    }

    @Bean
    @ConditionalOnMissingBean
    public StringRedisTemplate stringRedisTemplate(RedisConnectionFactory redisConnectionFactory) throws UnknownHostException {
        StringRedisTemplate template = new StringRedisTemplate();
        template.setConnectionFactory(redisConnectionFactory);
        return template;
    }
}
实际上StringRedisTemplate是RedisTemplate的子类,对于String类型,更推荐使用前者,它的类型只能是String的,会有类型检查上的安全;而RedisTemplate可以操作任何类型。
2.2 实现数据访问层
本文通过RedisTemplate对Redis进行操作,所以我们需要将它注入进来。代码如下:
package com.pkslow.springbootredistemplate.dal;

import org.springframework.beans.factory.annotation.Autowired;
import org.springframework.data.redis.core.RedisTemplate;
import org.springframework.stereotype.Repository;

@Repository
public class UserDAL {
    @Autowired
    private RedisTemplate<Object, Object> redisTemplate;

    public void setValue(Object key, Object value) {
        redisTemplate.opsForValue().set(key, value);
    }

    public Object getValue(Object key) {
        return redisTemplate.opsForValue().get(key);
    }
}
RedisTemplate提供了丰富的方法,具体可以参考官方文档,本次用到的及类似的方法有:
- opsForHash(): 返回对于Hash的操作类;
- opsForList(): 返回对于列表List的操作类;
- opsForSet(): 返回对于Set的操作类;
- opsForValue(): 返回对于字符串String的操作类;
- opsForZSet(): 返回对于ZSet的操作类。
2.3 实现Controller
我们需要把功能通过Web的方式暴露出去,实现以下Contrller:
package com.pkslow.springbootredistemplate.controller;

import com.pkslow.springbootredistemplate.dal.UserDAL;
import com.pkslow.springbootredistemplate.model.User;
import org.springframework.beans.factory.annotation.Autowired;
import org.springframework.web.bind.annotation.*;

@RestController
@RequestMapping("/userTemplate")
public class UserTemplateController {

    @Autowired
    private final UserDAL userDAL;

    public UserTemplateController(UserDAL userDAL) {
        this.userDAL = userDAL;
    }

    @GetMapping("/{userId}")
    public User getByUserId(@PathVariable String userId) {
        return (User)userDAL.getValue(userId);
    }

    @PostMapping("/{userId}")
    public User addNewUser(@PathVariable String userId,
                           @RequestBody User user) {
        user.setUserId(userId);
        userDAL.setValue(userId, user);
        return user;
    }

}
只提供两个接口,分别是设值和取值。
2.4 通过Postman测试
(1)存入对象
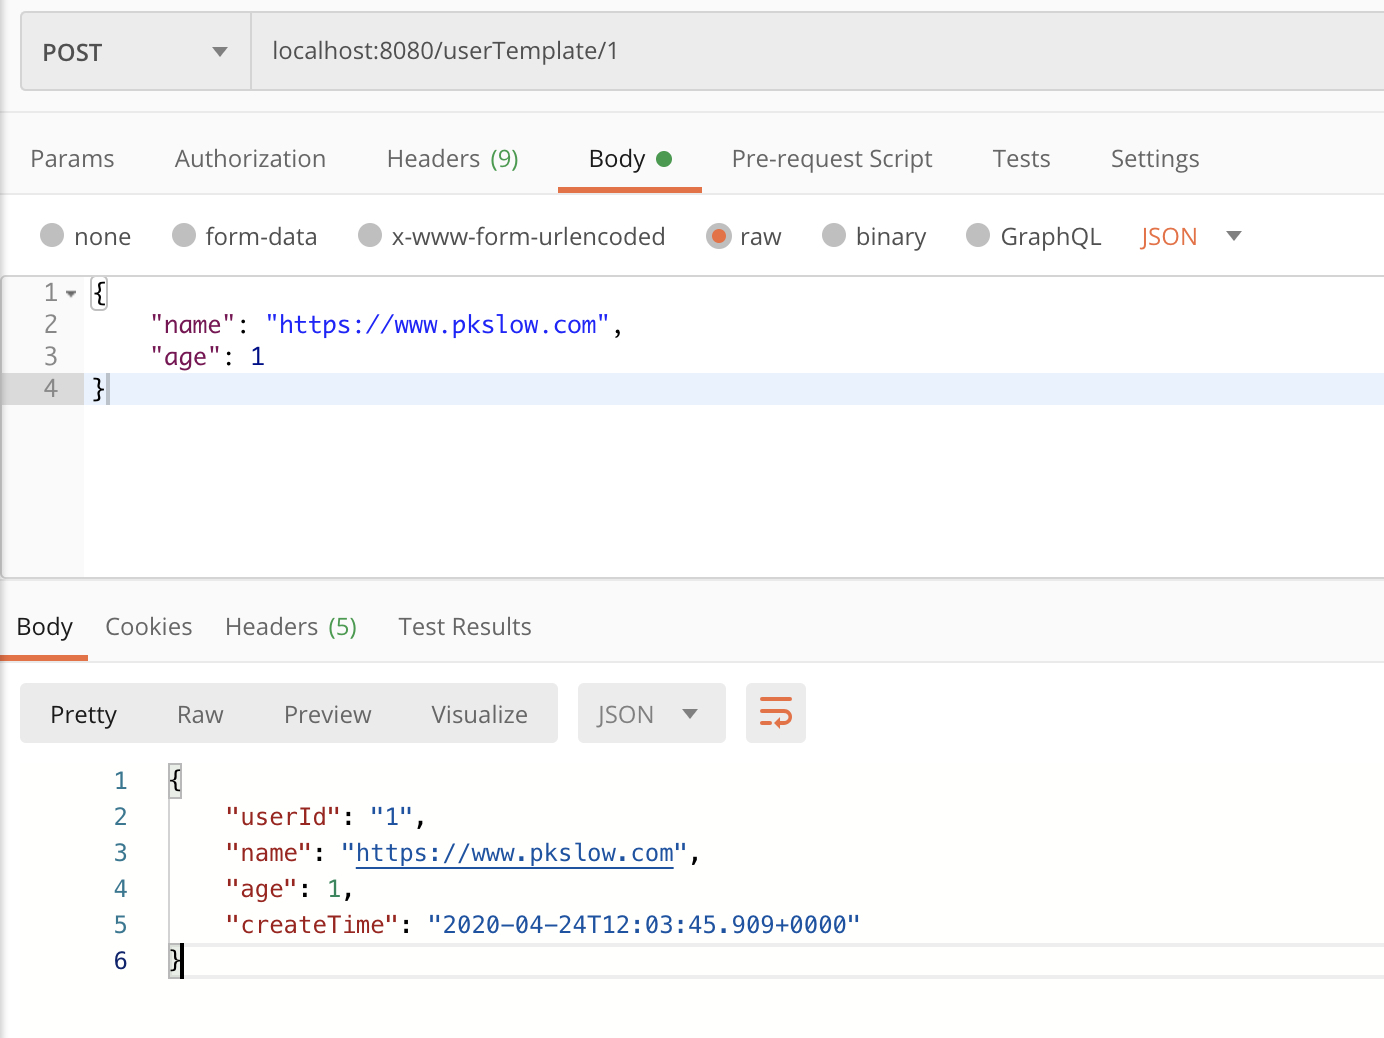
(2)读取对象
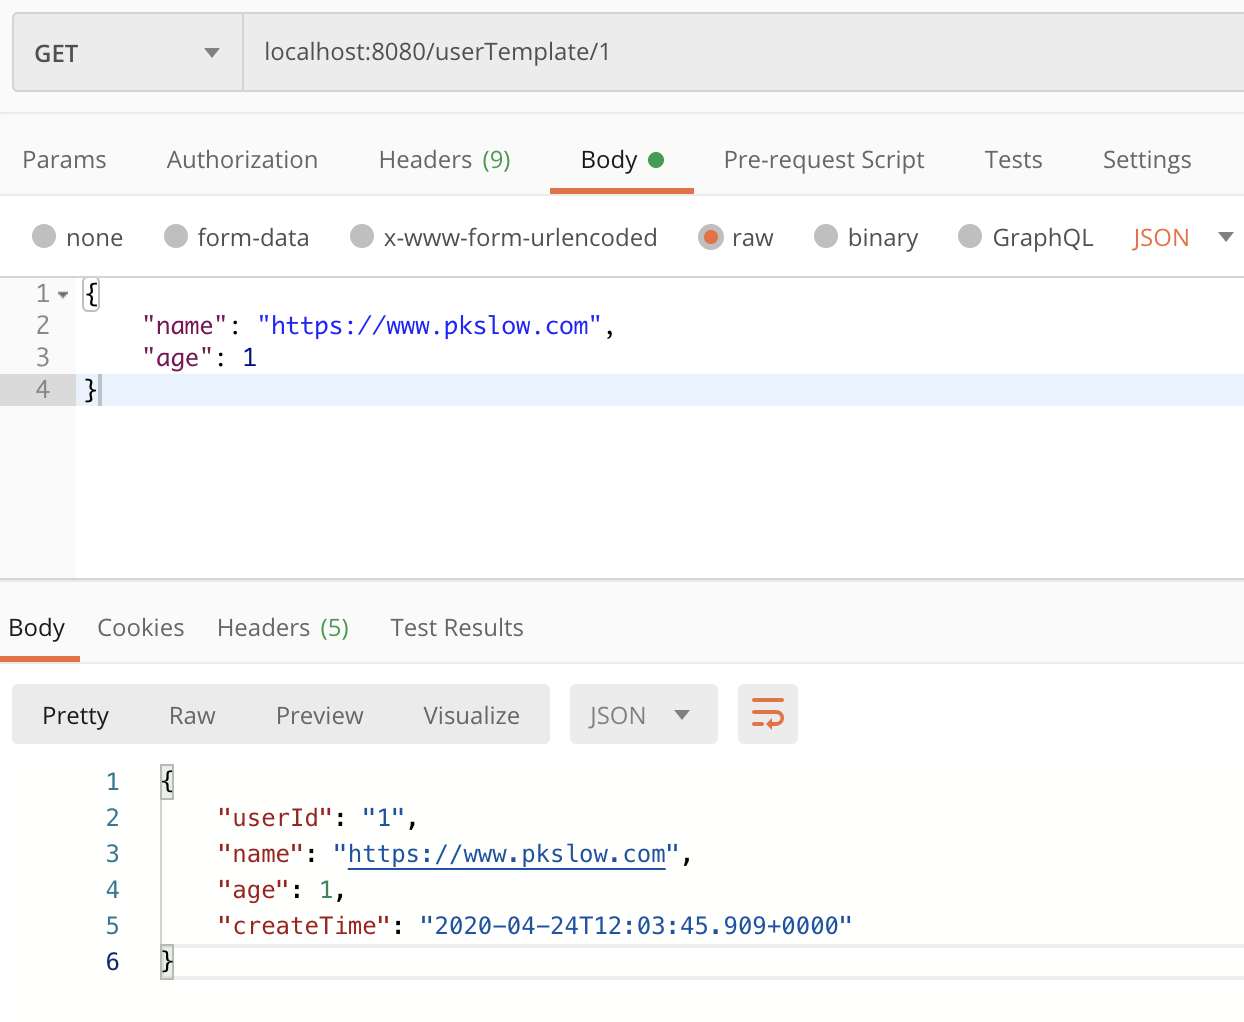
能写能读,功能实现,完美!Perfect!收工!
3 序列化问题
程序功能正常运行一段时间后,运维杀来了:“这是什么东西?我怎么看得懂?我要怎么查看数据?”
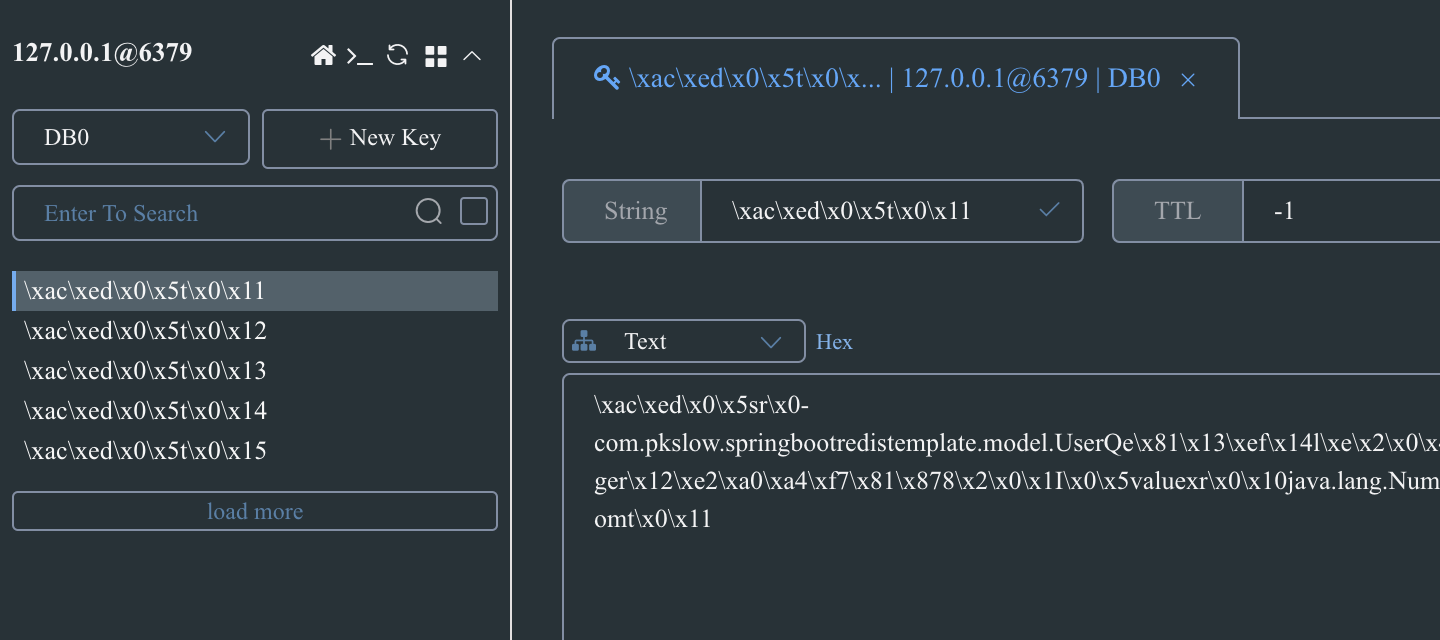
3.1 定位问题
不得不重新打开项目代码,Debug一下看看哪出了问题。既然用Postman测试能正常显示,而数据库显示不对,说明是写入数据库时做了转换。查看RedisTemplate就行了,毕竟活是他干的(先疯狂甩锅)。
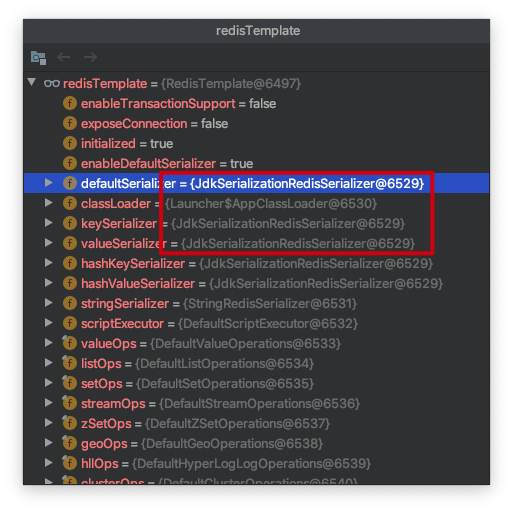
看它的序列化类用的是默认的JdkSerializationRedisSerializer,所以序列化后的数据我们看不懂。
3.2 问题修复
甩锅完后,还是要修复问题的,毕竟代码是自己写的。关键就是替换掉RedisTemplate所使用的序列化类就行了,这有两个方案可选:
(1)自定义一个新的RedisTemplate以覆盖旧的,在定义的时候指定序列化类。大致代码如下:
@Bean
public RedisTemplate<String, Object> redisTemplate(RedisConnectionFactory redisConnectionFactory) {
  Jackson2JsonRedisSerializer<Object> jackson2JsonRedisSerializer = new Jackson2JsonRedisSerializer<Object>(Object.class);
  ObjectMapper om = new ObjectMapper();
  om.setVisibility(PropertyAccessor.ALL, JsonAutoDetect.Visibility.ANY);
  om.enableDefaultTyping(ObjectMapper.DefaultTyping.NON_FINAL);
  jackson2JsonRedisSerializer.setObjectMapper(om);

  RedisTemplate<String, Object> template = new RedisTemplate<String, Object>();
  template.setConnectionFactory(redisConnectionFactory);
  template.setKeySerializer(jackson2JsonRedisSerializer);
  template.setValueSerializer(jackson2JsonRedisSerializer);
  template.setHashKeySerializer(jackson2JsonRedisSerializer);
  template.setHashValueSerializer(jackson2JsonRedisSerializer);
  template.afterPropertiesSet();
  return template;
}
甚至还可以自定义RedisConnectionFactory,如下:
@Bean
JedisConnectionFactory jedisConnectionFactory() {
    JedisConnectionFactory jedisConFactory = new JedisConnectionFactory();
    jedisConFactory.setHostName("localhost");
    jedisConFactory.setPort(6379);
    return jedisConFactory;
}
(2)使用原有的RedisTemplate,在使用前替换掉序列化类
引用的类的代码如下,init方法作为初始化方法:
public class UserDAL {
    @Autowired
    private RedisTemplate<Object, Object> redisTemplate;

    public void init() {
        redisTemplate.setKeySerializer(new StringRedisSerializer());
        redisTemplate.setValueSerializer(new Jackson2JsonRedisSerializer<>(Object.class));

    }

    public void setValue(Object key, Object value) {
        redisTemplate.opsForValue().set(key, value);
    }

    public Object getValue(Object key) {
        return redisTemplate.opsForValue().get(key);
    }
}
然后在创建UserDAL时,代码如下:
@Bean(initMethod = "init")
public UserDAL userDAL() {
  return new UserDAL();
}
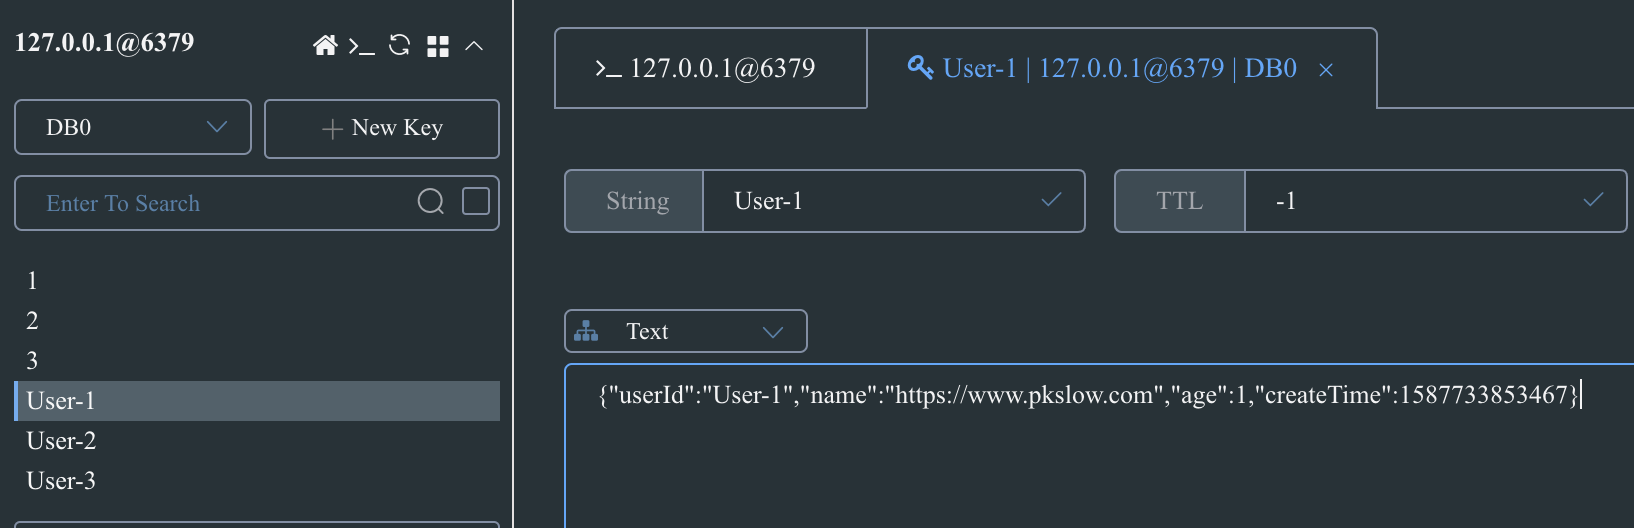
重新提交代码、重新测试、重新发布,结果可以了:
4 总结
本文详细代码可在南瓜慢说公众号回复<SpringbootRedisTemplate>获取。